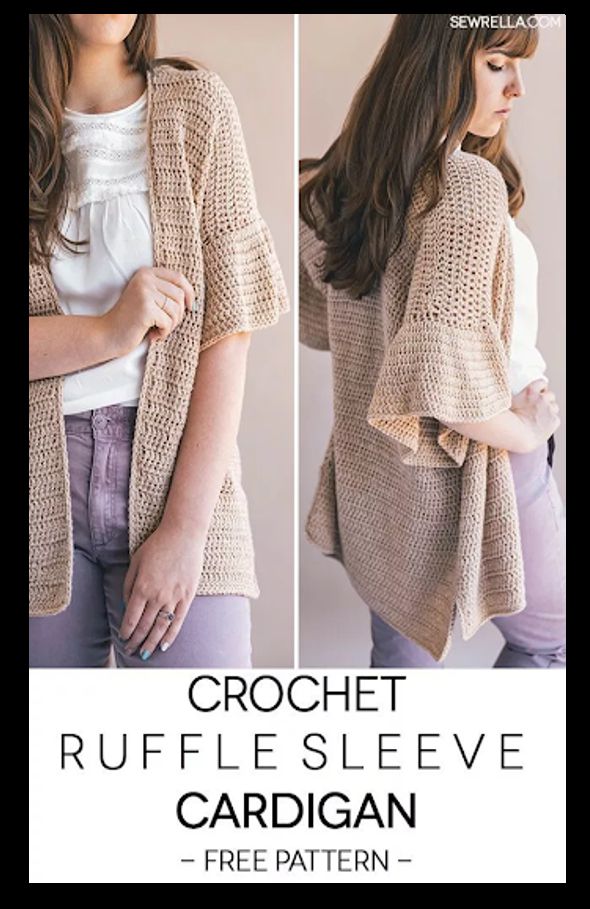
Sewrella's Ruffle Sleeve Cardigan
Skill Level: 1-Beginner
A few rectangles and ruffles create this super simple and chic jumper!
Materials:
Worsted Weight (#4) Yarn. (Cardigan shown was made with Lion Brand Jeans Colors in Khaki)
Size J 6mm crochet hook
Stitch markers (optional)
Gauge:
13.5 Dc = 4″
7.25 rows = 4″
Sizing:
Bust: 30″ (XS) 34″ (S) 38″ (M) 42 " (L) 46″ (XL) 50″ (XXL) 54″ (XXXL)
Width across back: 20″ (XS) 21″ (S) 22″ (M) 23″ (L) 24″ (XL) 25″ (XXL) 26″ (XXXL)
Length: 24″ (XS) 25″ (S) 26″ (M) 26.5″ (L) 27″ (XL) 27.5″ (XXL) 27.5″ (XXXL)
Armhole: 6″ (XS) 7″ (S) 7.5″ (M) 8″ (L) 8.5″ (XL) 9″ (XXL) 9.5″ (XXXL)
Sleeve Length: 4.5″ (XS) 5″ (S) 5″ (M) 5.5″ (L) 5.5″ (XL) 6″ (XXL) 6″ (XXXL)
Abbreviations:
ch – chain
sc – single crochet
dc – double crochet
st(s) – stitch(es)
rep – repeat
t – turn
Difficulty Level:
Level 1 – Beginner
Pattern & Sizing Notes:
Sizing listed in the pattern will be in X-Small with Small, Medium, Large, Xl, 2X, and 3X listed in parenthesis such as 36 "(41, 46, 51, 56, 61, 66)" whereas Ch 36 for size XS, 41 for size S, 46 for size M, 51 for size L, 56 for size XL, 61 for size 2X and 66 for size 3X. When only one number is given, it applies to all sizes. To follow pattern more easily, circle/highlight all numbers pertaining to your size before beginning.
This cardigan is worked in 3 pieces, 2 front panels and 1 back panel then seamed together. Ruffled sleeves are worked off of the armholes last.
All sizing is slightly oversized. If you want a more figure-hugging fit, size down.
Ch 2 does not count as a st throughout.
Cardigan
Back Panel:
Ch 62 (66, 68, 72, 74, 78, 80)
Row 1: Dc in 4th from hook and each across, Ch 2 t (59, 63, 65, 69, 71, 75, 77)
Row 2: Dc in each st across, Ch 2, t (59, 63, 65, 69, 71, 75, 77)
Repeat Row 2 46 (48, 50, 51, 52, 53, 53) more times.
Your rectangle should measure close to the sizing listed below (remember – if you have slight variance, it won't matter too much in the long run).
XS: 18 x 24"
S: 19 x 25"
M: 20 x 26"
L: 21 x 26.5"
XL:22 x 27"
XXL: 23 x 27.5"
XXXL: 24 x 27.5"
Finish off, weave ends.
Front Panels:
*make 2
Ch 32 (34, 35, 37, 38, 40, 41)
Row 1: Dc in 4th from hook and each across, Ch 2 t (29, 31, 32, 34, 35, 37, 38)
Row 2: Dc in each st across, Ch 2, t (29, 31, 32, 34, 35, 37, 38)
Repeat Row 2 46 (48, 50, 51, 52, 53, 53) more times.
Your rectangle should measure close to the sizing listed below (remember – if you have slight variance, it won't matter too much in the long run).
XS: 9 x 24"
S: 9.5 x 25"
M: 10 x 26"
L: 10.5 x 26.5"
XL: 11 x 27"
XXL: 11.5 x 27.5"
XXXL: 12 x 27.5"
Finish off, weave ends.
Seaming Shoulders:
With a long piece of spare yarn, thread your tapestry needle.
Place both front panels on top of your back panel with right sides together (wrong sides facing you). Be sure you've lined up the foundation chain end of each panel on the hemline of the cardigan (this side won't be sewn together). The front panels should fit together over the back panel to make a perfect rectangle.
Use a mattress stitch to seam the shoulders of your cardigan together. Work along the last row of each panel, sewing through the tops of the stitches. You should have one stitch length between your front panels unworked.
Weave ends.
Side Seams:
With another long piece of spare yarn, thread your tapestry needle.
use a tape measure and stitch marker to measure Andy mark the correct armhole length for your size. I'm making a size medium so I'll mark 7.5" below the shoulder seam join on both the front and back panels.
Begin mattress stitching at the stitch marker, leaving your armhole opening. Mattress stitch down side seam until you have 3" left unworked. Backstitch a few times and weave ends. (Or sew to bottom if you don't want to leave hip opening slits).
Repeat on the other side.
Turn your cardigan right side out.
Edging:
With the right side of the cardigan facing you, join yarn to any corner of the hemline (I joined to the right bottom corner where the hemline and the neckline meet), Ch 1
Neckline: Sc evenly to the shoulder seams (along the rough edge of your first front panel), Sc in the 1 unworked stitch of back panel between front panels, Sc evenly down the rough edge of your second front panel, 3 Sc at corner
Hemline: Sc in each st along hemline of front panel (working into other side of the foundation ch), 3 Sc at corner
Hip Slits: Sc up first rough edge of hip slit opening, skip the end of the side seam, Sc down other rough edge of hip slit, 3 Sc at corner
Back Hemline: Sc in each st along hemline of back panel (working into other side of the foundation ch), 3 Sc at corner
Repeat Hip slit on other side
Repeat front panel Hemline on other side, sl st to join, Ch 1
Round 2: Sc in each st all the way around (do not work extra sts in corners), sl st to join, finish off. Weave ends.
Ruffle Sleeves:
(Now for the fun part!)
Join yarn the the bottom of the armhole/what will be the underarm area, Ch 2
Row 1: Dc evenly around the armhole opening, sl st to join, Ch 2 (44, 48, 52, 56, 60, 64, 68)
Row 2: 2 Dc in each st, sl st to join, Ch 2 (88, 96, 104, 112, 120, 128, 136)
Row 3: Dc in each st, sl st to join, Ch 2(88, 96, 104, 112, 120, 128, 136)
Repeat Row 3 6 (7, 7, 7, 8, 8, 9) more times.
Last Row: Sc in each st, sl st to join
Finish off, weave ends.
Repeat on other armhole.
Free video tutorial for size M is on YouTube!
https://youtu.be/Gld2_5vHVqQ
Bạn đang đọc truyện trên: Truyen247.Pro