
Part iii. Planning Your Plot Timeline
(Yes, the above image is of JK Rowling's timeline notes to the plot of Harry Potter and the Order of the Phoenix).
Time
Your novel's time frame is a basic element of your setting. What you pick—the past, the present, the future, a particular historical time period, an alternative timeline—will affect everything from how your characters speak, to what they wear, to how they behave and interact with one another, to how they get around.
The season matters, too. Spring in Iceland. Winter in Puerto Rico. Fall in Dubai. What you choose will shape and constrain your storytelling.
Another aspect of time is how long your story spans—is it a day, a year, a decade, or several centuries? The duration will determine whether you will be able to tell your story as a continuous timeline or in separate episodes. It will also determine whether you will need to jump ahead or back in time.
Plot Planning Strategies
Some writers need to know before they start writing, scene by scene, the progression of the plot for their entire novel.
Others need to have some idea of what's going to happen in the beginning, in the middle, and at the end but are happy to start writing and discover how parts connect. (This one's me.)
Still, others start with a vague idea of where they're going, a main character, and an opening scene, but they like to be surprised as their characters take over, moving their story along.
There simply is no single method that works for every writer or for every book, so you have to try different approaches until you find one that suits your strengths and style.
Some authors write a detailed outline of every scene in the novel.
Others only feel as if they need to outline the first scene, the major turning points, and the ending.
Others tell the story from start to finish in a detailed synopsis (also what I do).
Still, others are content to just take lots of notes and write character sketches before jumping into writing page one (I'll be developing character sketches more in the next section of characterization).
Writers disagree on whether and how much planning is needed. Interestingly, though authors disagree widely about whether to outline first, most authors agree on the necessity of creating an outline after writing. An outline of what you've written gives you an overview of your story thus far and will provide a perfect starting point for revision.
Scene-by-Scene Outline
Many authors like to write a scene-by-scene outline of their book before they start writing. A basic outline gives a brief description of what happens in each scene.
Here's an example of the outline of the first four scenes in my novel, "When Dreaming Becomes Dangerous."
Scene 1: In a dream, Mira Ackler experiences the same recurring dream she has had since the death of her mother two weeks prior. She's in a snowy meadow surrounded by thick pine trees. A white wicker arch is next to her. She discovers she's in a lace wedding gown and next to her in a black tuxedo is her mystery man with blonde hair and eyes blue as the sky. They lean in to kiss, but she wakes up before it can happen.
Scene 2: Monday morning, Mira wakes up and gets ready for work as a speechwriter for the mayor of Eron city. Sadie, her white terrier pup, greets her, asking for cuddles. She worries over her heart condition that appeared after her mother's passing. She enjoys a cup of coffee while thinking about her current life situation.
Scene 3: Continued, Mira shows up for work and it's chaos. A rumor broke out that the mayor was having an affair. By the time five o'clock chimed through the office's mahogany grandfather clock, she was exhausted. She took the metro back to her apartment, and steps in a pee puddle left by Sadie. Mira cleans it up then crashes on her bed, waiting for her dreams to begin.
Scene 4: In the recurring dream, but it changes slightly. After leaning in for a kiss, Mira grabs the back of mystery man's neck before everything goes black. She's still in the dream, but now sitting on a white-washed, wooden bench surrounded by pine trees. The mystery man is sitting next to her staring off into the distance. She tries to speak to him, but nothing comes out of her mouth. She tries getting his attention, even shaking his arm, but he doesn't budge.
In a scene-by-scene outline like this, the author sketches out the basics of each scene, including these elements:
• When it happens
• Where it happens
• Which characters are in the scene
• What happens
Find the "Tent Poles" of Your Plot
The prospect of sketching out, even in a high-level outline, all forty to seventy scenes (the average amount in a novel) of your novel can be daunting. You may be able to envision the scenes beginning and how your story is going to end, but laying out the middle in detail may seem impossible.
So, a useful alternative approach to outlining is to begin by staking out what can be thought of as "tent pole" scenes—these are the key turning points in your book, those scenes that are most essential to your story.
Here are five key scenes you might want to stake out in advance:
1. The opening scene.
2. The scene that marks a major turning point at the end of Act I.
3. The scene that marks a major turning point at the end of Act II.
4. The scene where the plot climaxes near the end of Act III.
5. The scene that provides resolution at the end of Act III.
Take "The Wizard of Oz" as an example, here are one-sentence descriptions of the tent-pole scenes in that story:
1. Dorothy and Toto are swept away in a cyclone and land in Oz (opening).
2. The Wizard meets Dorothy and her friends and tells them that before he'll grant their wishes they must bring him the broomstick of the Wicked Witch of the West (reversal at the end of Act I).
3. Dorothy is captured by the winged monkeys and carried off to the witch's castle (reversal at the end of Act II).
4. Dorothy melts the witch (climax in Act III).
5. Dorothy's return to Oz with the witch's broomstick and uses the ruby slippers to carry her home (resolution at the end of Act III).
Of course, much more happens in this story, but nailing five key plot points like these is a good way to jumpstart your planning process.
Filling in the Scenes Between the Tent Poles
The next step is to write a short description of every scene you can envision between these tent-pole scenes.
You will probably find it easier to envision in detail, scenes that take place early in your novel around the opening and end of Act I, and also the scenes that will come in and around the climax at the end.
Do the best that you can, outlining as many of the scenes as you can envision, but don't worry if there are gaps. The scenes that take place in the middle of your novel will start to take shape by the time you reach that point.
Early on, there's no need to worry about how to group the scenes into chapters. Just think in terms of scenes. Chapter breaks can be easily inserted later.
An outline is a wonderful planning tool and can make writing flow much more quickly. Just don't so focused on your outline that you become afraid to drift away from it. Be prepared for inspiration to strike as you write a scene—it may turn out entirely different from what you originally planned.
Writing Notes and Sketches
A more informal approach works for some writers. They begin quickly jotting down ideas for characters, setting, and plot on index cards. Then they apply some organizational structure to the chaos.
For instance, they might take all the character cards and group together ideas about each character. They might organize plot cards by plot and subplot, and sort them all chronologically, and finally, separate them into three acts.
If your character is taking an actual journey in the book, you might go a step further and draw a map on a big piece of paper and stick event Post-it notes at different points along the journey.
If your story takes place over an extended time period, you might want to draw a timeline on a big piece of paper and stick Post-it notes with the events when they occur at different points along the timeline.
Writing a Detailed Synopsis
Writing out the plot of the novel, in synopsis form, is another way that many authors get ready to write. They "tell" their story, fast-forward, getting down to the main story line without trying to dramatize every scene.
The point of a detailed synopsis is to tell the story, from start to finish, in sufficient detail to show how all the plot and subplots flow fluently and how all the characters and settings fit together. A synopsis for what will be a 300-page manuscript can be as short as ten pages or as long as sixty pages.
Writers who create a detailed synopsis often find that, having nailed down the details of their story, once they sit down to write the actual novel they can concentrate on the details, the dialogue, and the action, and they don't get stuck worrying about where the story is going next.
As a working document, a synopsis is very different from an outline. It is not broken down into scenes, does not spell out viewpoint changes, or time shifts, but it shows how the pieces of the plot articulate with one another. The great advantage of writing a detailed synopsis is that it requires you to think through all the plot twists and turns and fully understand how each part of the story connects to the next.
Storyboarding
Storyboarding is another plot development process, one that novel writers have borrowed from screenwriters. Traditionally, storyboarding involves arranging a series of images for a film, showing visually how the plot will progress.
Novelists have adapted this process, drawing or writing the basics of each scene on index cards. Answers to these key questions go on each card:
• When and where does the scene take place?
• Which characters are in the scene?
• How does the scene open?
• What is the main thing that happens/changes?
When all the scenes have cards, they get arranged in storytelling order. Retracing the cards, you will find gaps that need to be filled, including those places where your story jumps and needs some connective tissues. You may find some spots where you need to insert a blank card to hold the place, hoping that by the time you get to writing that part of the novel, inspiration will have struck and you'll know what scene or scenes should fill the gap.
Jane's Plotting Road Map
If you're a perfectionist who loves to follow a guide to every specific detail, author of "Mastering Suspense, Structure, & Plot," Jane Cleland's road map might be the plotting process for you. Jane has successfully published over nine novels following her road map below:
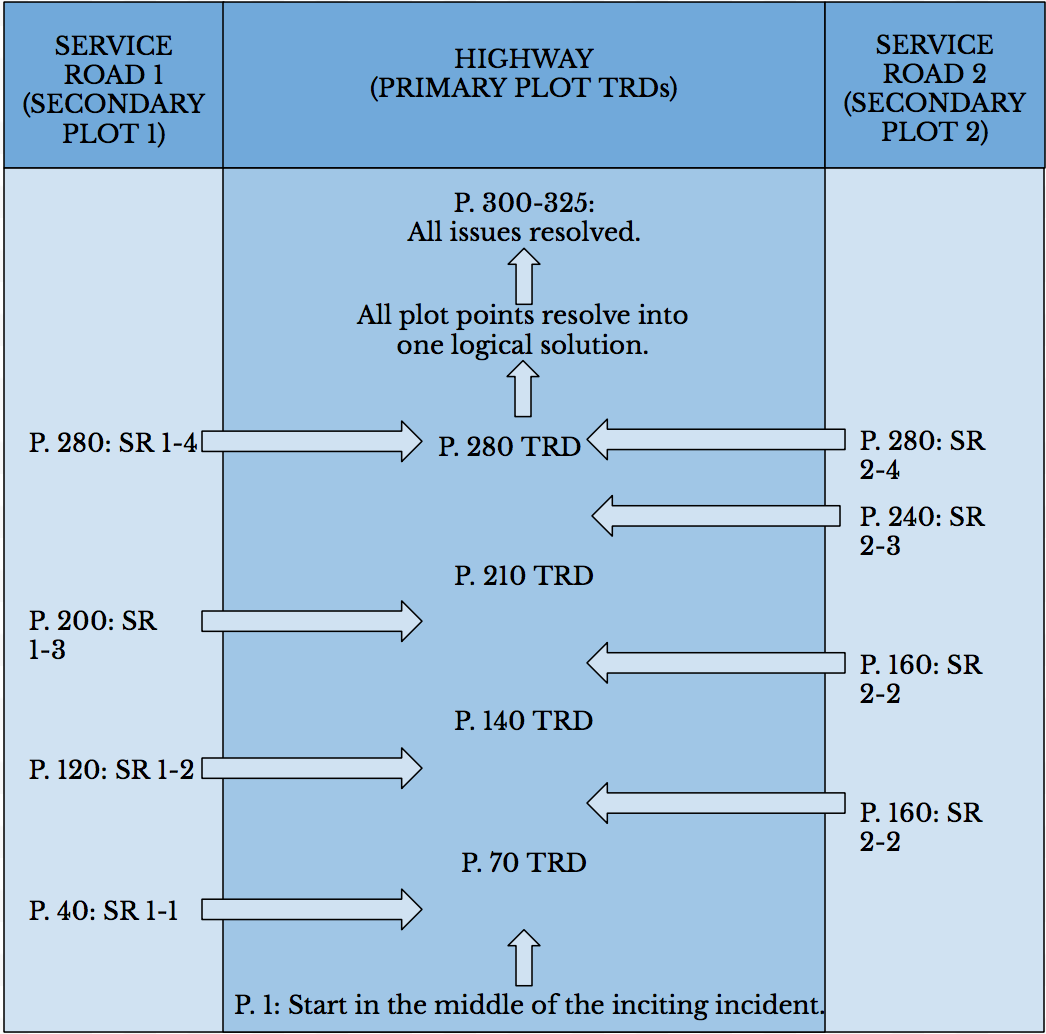
The main elements of Jane's Plotting Road Map include the highway, service roads, and TRDs (twists/reversals/dangers). The highway, which runs from the bottom to the top, represents the path your primary plot will follow. Service Road 1 and Service Road 2, abbreviated as SR1 and SR2, are located on either side of the highway and represent the paths of your two subplots.
TRDs include plot twists, plot reversals, or moments of heightened danger, and are a key to effective storytelling. In most books of about 300 to 325 pages, you should place for four TRDs that occur every 70 to 90 pages. In the map above, they are placed along the main highway at pages 70, 140, 210, and 280.
In addition to TRDs, you should insert a scene relating to one of your subplots (alternating between them) approximately every 40 pages. Follow this pattern to the end, and all three plotlines will weave together in a seamless satisfactory conclusion.
A plot twist takes the reader in an unexpected direction.
A reversal takes the story in the opposite direction to what the reader expects.
Moments of heightened danger can be physical or emotional.
As you evaluate which of the three options to choose at any point along the highway, remember to mix it up. Unless you're working in a very short form, you're going to have more than one TRD.
Using Jane's Plotting Road Map guarantees your story will be multilayered but not confusing. Most readers won't be aware of the structural rhythm you've created; they'll simply perceive that your story is impossible to put down, appropriately paced, and wonderfully intricate.
Finally
Remember, how you plan and what tools you use are your choice. The tools you use and the processes you follow should help you write the novel, not get in your way.
Have you used any of theses processes before? What works best for you? I'd love to hear your thoughts and I'm sure other readers would as well.
If this part opened your eyes to new plotting processes, please give it a vote!
Bạn đang đọc truyện trên: Truyen247.Pro